Adding new placeholder/hook
If you are a developer of a plugin, which provides hooks, you can add support for the Hooks Manager in your plugin and make your hooks appear under the Hooks item in the Administration section.
If you use some third party plugin, which provides a hook you want to use in the Hooks Manager, or if you want to utilize some Redmine core hook, which is not supported by this plugin, you can add support for this hook by yourself.
This Wiki page describes how to do this...
About the sample hook
As a sample hook I chose the view_news_show_left hook, which is provided by my Meta plugin. This hook allows to place custom HTML code on news page below the content and above comments (check the position of the Facebook “Like” button on this page).
Choosing placeholders.yml
- If the hook, that you want to add, is introduced by the plugin, put the
placeholders.ymlinto theconfigdirectory of that plugin (or create such directory, if it does not exist). - Otherwise use the
placeholders.ymlof the Hooks Manager.
placeholders.yml file before the upgrade and then to move your custom placeholders to the new version of this file.- Alternatively you can also write a small plugin specially for providing the
placeholders.ymlfile. This method, however, won’t be reviewed here. Still you can check this tutorial on how to write plugins.
Adding entry to placeholders.yml
Now open the config/placeholders.yml file in your favorite editor and add the following entry:
view_news_show_left:
  url: /news/:id
  outline: news
  page: :news
  location: :content
  basic: true
  requires: 2.4
view_news_show_leftis the name of the hook;urlcontains the "format" of URL for news pages (this format will be used to generate a sample URL);outlinecontains the name of the page thumbnail (see below);pageis the identifier of the page name (the actual translated name is specified in language files);locationis the identifier of the placeholder's location on a page (the display name is specified in language files);basictells, that the placeholder should be shown by default (ifbasicis set tofalseor omitted, users will need to toggle the "Show all hooks" checkbox to make the placeholder visible).requiresspecifies the version of Redmine, in which the hook was added.
Display texts and translations
The placeholders.yml file provides technical details to the Hooks Manager. But you also need to make sure to provide useful display texts to end-users. This must be done in plugin language files.
Language files can be found in the config/locales directory of the plugin and have names xx.yml, where xx is the language identifier.
Use language files of the plugin, to which you add the hook (into its placeholders.yml file). If that plugin does not have language files, just create ones (see language files of the Hooks Manager for samples).
Now let's speak about what strings you may want to add (we will use en.yml for English language):
- In our case we specify
:newsas a page identifier. This is a new identifier, which is not used by the Hooks Manager, therefore we need to add its "translation" (i.e., the display text) to the language file:hook_page_news: News page
Thus, if the identifier was, e.g.,:projector:profilewe would not need to add its display text as the Hooks Manager itself already provides it. Notice, that the language identifier is prepended withhook_page_. - In our sample we use
:contentas a location identifier, which is already introduced by the Hooks Manager, so we do not need to add its display text. If we used some new location identifier (but please avoid doing this), we would need to add its display text to the language file using the language identifier prepended withhook_location_. Thus the language identifier for:contentishook_location_content. - A page may contain many placeholders in one location area. If this is the case, we should also add a description of the placeholder. We may also add the description to make it more exact, where the placeholder is. So let's do it for our sample placeholder:
description_view_news_show_left: above comments
As you see the description uses the hook name prepended withdescription_.
Creating outline
The news page is quite specific and, therefore, none of existing outline files can be used in our case, so we need to create one. The new outline file is to be placed into the #{PLUGIN_DIR}/app/views/placeholders/ directory and named _news.html.erb (this name is formed from the value news, which was specified for outline).
If any of the existing outline files could be used, we would just copy it into our #{PLUGIN_DIR}/app/views/placeholders/ or modify it in place (if we added the placeholder to the Hooks Manager's placeholders.yml).
So we create this file and put the following content into it:
<div class="hooks-top-menu"></div>
<div class="hooks-header"></div>
<div class="hooks-main nosidebar">
  <div class="hooks-content">
    <div class="hooks-data"></div>
    <% if hook == :view_news_show_left %>
      <div id="hook-content"></div>
    <% end %>
    <div class="hooks-box"></div>
    <div class="hooks-box"></div>
    <div class="hooks-box"></div>
  </div>
</div>
<div class="hooks-footer"></div>
The HTML structure of this outline is very similar to the Redmine's HTML structure. The outline is built with <DIV>'s having specific CSS classes. For meanings of CSS classes, which are used in outlines, check this page.
The <DIV> having its id set to hook-content is a placeholder and gets highlighted, when shown to the user. As far as an outline file can be used for different placeholders it's recommended to use the if clause to determine, if the placeholder is to be shown. The special variable hook contains the current hook name for the current placeholder.
When rendered this outline looks this way:

Checking result
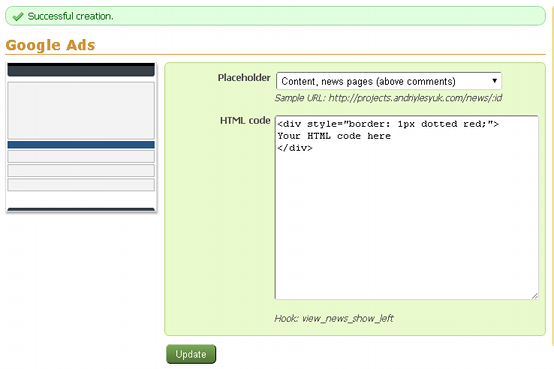
When the entry has been added and the outline file has been created restart Redmine and go to Administration -> Hooks.
Here you will find the entry we just added:

Now put your HTML code into the text area and click "Create".
After that open any news page and enjoy the result:
