OpenID fix plugin for Redmine/ChiliProject
If you try to login into “clean” Redmine/ChiliProject using Google OpenID you will get the registration form. This happens because Redmine requires some user fields which do not get retrieved during OpenID authentication.
The OpenID fix plugin patches Redmine / ChiliProject OpenID authentication to make it work with Google OpenID.
I’m also ready to support other OpenID providers.
Plugin configuration
The plugin configuration can be found in Administration → Plugins → OpenID Fix → Configure:

Self-registration
With this option the plugin allows to specify a different value for the Self-registration option, which can be found in Administration → Settings → Authentication.
By default the plugin uses:
- “manual account activation”, if this value is specified for the Self-registration option in Administration → Settings → Authentication;
- “automatic account activation”, otherwise.
This was done for backwards compatibility.
Verify OpenID URL
This option enables the OpenID provider whitelisting – i.e., when it’s checked, the OpenID authentication menu item is added to Administration.
OpenID provider whitelisting
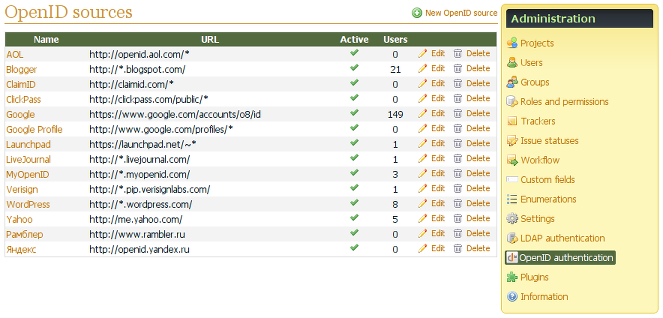
The OpenID Fix plugin (version 0.2.0) comes with the OpenID provider whitelisting feature, that lets you specify, which OpenID providers will be allowed to authenticate against. The list of such providers can be maintained under the new OpenID authentication menu item in Administration:

Check this page for the list of built-in OpenID sources.
URL pattern
The main component of the OpenID source record is the URL – this is the so-called OpenID URL, which should be specified in the Sign in form. The very similar URL is also used internally as the user identity URL (you might need to have separate records for them, if they are too different).
The URL is the “pattern” of the real URL – it supports wildcards:
*stands for any number of any characters.https://matcheshttps://andhttp://.
Requirements
In order to use this plugin you must enable “Allow OpenID login and registration” in Administration → Settings → Authentication.
Install
Install the plugin:
- For Redmine 2.x.x and above:
- Copy
openid_fixdirectory to#{RAILS_ROOT}/plugins - Run:
rake redmine:plugins:migrate RAILS_ENV=production
- Copy
- For older Redmine and ChiliProject:
- Copy
openid_fixdirectory to#{RAILS_ROOT}/vendor/plugins - Run:
rake db:migrate:plugins RAILS_ENV=production
- Copy
- Restart Redmine/ChiliProject
- Optionally, add custom OpenID sources and/or modify existing ones
Administration → OpenID authentication. - Or, optionally, disable the Verify OpenID URL option
Administration → Plugins → OpenID Fix → Configure.