Project Sections plugin
The Project Sections plugin makes it possible to truly categorize your projects by, among other things, splitting them between sections. Sections also let you “describe” projects better as their names are prepended to project names (e.g., “Redmine › Project Sections”, where “Redmine” is a section). Additionally sections modify URLs to projects’ overview pages this way making them more descriptive and SEO-friendly (e.g., "/project/redmine/project-sections”).
The section hierarchy is built “on top” of the project hierarchy, i.e., you can select sections only for root top-level projects and all their subprojects are forced to share parent projects’ sections. Though section hierarchy can include root and leaf sections and a project can be “attached” to a leaf or to a parent section.
It’s also possible to define project, version and issue custom fields, which will be available only for projects, that belong to specified sections. For this, the plugin allows to select such sections in project, version and issue custom field edit forms.
Managing project sections
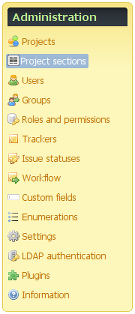
Project sections can be managed under the new “Project sections” menu item in Administration.

Certainly only administrators can manage sections here.
The list of project sections includes the special virtual Unsectioned section, which just shows the number of projects, that do not belong to any section:

Here sections can be added and edited using the form:

Like for projects the identifier of a section can be set only once.
Moving project to section
To be able to assign a section to a project one should have the “Select project section” permission (this permission is added by the plugin) or be an administrator. In either case this can be done in the main project form, which is available under the “Information” tab in project settings, or on the new project page:

Note, that a project can have either a parent project or a section, not both!
Enjoying sections
As soon as you add a project to a section project sections become available throughout the system.
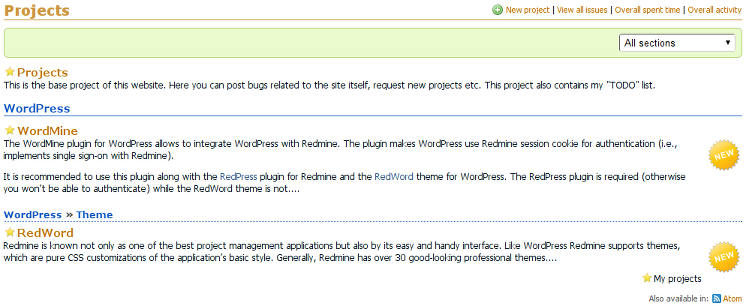
Thus the project list, which can be found under the “Projects” link in the top menu, gets split into sections:

“Unsectioned” projects go first here, then projects of a parent section go and then subsections with their own projects.
Each section has its own page, which copies the look and feel of the main project list. To get to the section page you can click the section heading or select the section from the drop-down list.
Section pages are also available under the links in the main project heading, which now also includes sections of the project:

Sections also affect names of projects in drop down lists. For example, check the jump box:

Effect on URLs
Sections are used not only to categorize projects, but also to extend and make their names more precise. This also effects project URLs, which now contain sections as well.
Thus, if we had “SCM Creator” in the section “Redmine » Plugin”, the new full name of the project would be “Redmine » Plugin › SCM Creator” and the new URL could be, e.g.:
project/redmine/plugin/scm-creator
Note, that the first URL segment is the singular “project”, not the plural “projects”, which is used by the core Redmine.
This URL change, however, applies only to the main project URL, which points to the project overview page.
Recommendations
- Choosing name of a section take into account, that:
- This name is going to be prepended to the project name!
Thus, “Redmine › SCM Creator” is fine, while “Redmine Plugins › SCM Creator” is, perhaps, too verbose. - This name should play nice with possible subsection and parent section names!
For example, “Redmine » Theme › Red-Andy”. - This name is going to be used as a title for a project list.
Here “Redmine Plugins” would work better, but you should consider all other usage cases as well.
- This name is going to be prepended to the project name!
- Avoid having empty parent sections!
Thus, if you have Redmine plugins and themes, consider putting ones of them into the parent section and have others, more specific ones, in a subsection. This way I have plugins in the “Redmine” section and themes in its “Theme” subsection. - Avoid too deep section hierarchy!
Usually two levels are more than enough. - If you feel, that you want to add some common phrase to your project name, consider creating a section instead!
Thus, instead of “Word-Andy theme for WordPress” consider creating “WordPress” and “Theme” sections to get “WordPress » Theme › Word-Andy”.
Install
To install this plugin do:
- Copy
project_sectiondirectory to#{RAILS_ROOT}/plugins - Install the awesome_nested_set gem (can be skipped, if you upgrade):
- If you installed Redmine using
bundle install ..., repeat that command in Redmine root directory, e.g.:bundle install --without development test
- Otherwise, install this gem using one of the following commands:
apt-get install ruby-awesome-nested-set(for Debian/Ubuntu)gem install awesome_nested_set(for other systems)
- If you installed Redmine using
- Run:
rake redmine:plugins:migrate RAILS_ENV=production - Restart Redmine
Themes support
For some themes it may be needed to fix display issues related to the Project Sections plugin. Instead of modifying the theme you can add such fixing CSS rules to the special CSS file named after the theme and located in the plugin's project_section/assets/stylesheets directory.
Thus, the plugin comes with CSS rules specific to the Red-Andy theme -- these rules can be found in the source:assets/stylesheets/red-andy.css file.
If you've modified some public theme for Redmine, please consider sharing your <theme>.css with me (using the Theme issue category), so I could include it into the next release of the plugin.